Face Mapping
Introduction
This is a brief tutorial how to achieve facemapping of a users portrait onto an existing face in your dynamic video. To achieve facemapping we will use two of the more advanced features of our scene description language (SDL), namely Morphing and UV Mapping to get the face into position, then use Masking to mask out the placed face and add lighting effects using additional overlays with appropriate blendmodes and opacity. The user image is fetched via HTTP.
As basis for this facemapping example, a 3D artist rebuilt the face in the video scene as a 3D model and then used a canonical face to texture it, generating the UV maps.
The UV maps are images that hold a lookup map for the face, the color information of each pixel determines which pixel of the texture should be displayed in this position in the video frame. By convention, the red channel of the UV map holds the X coordinate, the green channel holds the Y coordinate.
To use the user image as a texture instead of the canonical face image, the user image needs to be transformed so that eyes, nose and mouth are in the same position as in the canonical face. This is achieved by morphing the user image before applying the UV maps.
To build the example we use 4 Layers (VisualTracks) and 5 static assets, as well as the dynamic user image:
- The base video: uvbase.zip
- The dynamic user image:
- morphed to match features to a default face texture
- uv texture mapped using: faceuvmap.uvmap
- masked with: facemask.zip
- A light layer: faceeffect01.zip
- A shadow layer: faceeffect02.zip
Before going into the details of building the facemapping example we first need to take care of the basics.
Developer SDK
You can create Dynamic Movie Templates with our SDKs for Java, Javascript and Python as well as sending JSON encoded templates to the API directly. We recommend using a SDK.
Please see the Developer Tools & SDKs section for more information about the SDKs as well as how to use them.
This tutorial shows code for all languages on the right side. You can switch the language at the top of the page.
Once you have selected a language (and SDK) we will start by setting up a connection to the API and initialize a movie object into which we will be add elements, i.e. layers, transformations and effects.
API Connection
def main():
    conn = api.Connection(API_KEY, API_SECRET)
    project = conn.get_project_byuid(PROJECT_UID)

    movie = build_movie()
    project.create_dynamic_movie(movie, MOVIENAME)
// this code will be generated automatically if you
// use the Scripts Features in the Project Management Console.
FX.config.apiVersion = '2017-01-05';
FX.config.region = 'YOUR REGION';
var sdl = new FX.SDL()
var project = new FX.Project({params: {ProjectId: 'YOUR PROJECT ID'}});

project.createMovie({Name: "jsfacemap", Movie: build_movie()}).promise()
    .then(function() {
        console.log("Finished")
    });
public class FaceMapper {

    FXTemplateClient client;

    static final String apikey = "YOUR API KEY";
    static final String apisecret = "YOUR API SECRET";
    static final String prjuid = "YOUR PROJECT ID";
    static final String region = "YOUR REGION";

    public FaceMapper() {
        client = FXTemplateClient.builder()
                .withProvider(new StaticCredentialsProvider(apikey, apisecret))
                .withRegion(region)
                .build();
    }

    public static void main(String[] args) throws Exception{
        FaceMapper mapper = new FaceMapper();
        FXProto.Movie movie = mapper.buildMovie();
        String message = mapper.client.createTemplate(prjuid, "facemap_example", movie.toByteArray());
        System.out.println(message);
    }
}
You need your API credentials for interacting with our API. For this tutorial we assume there is already a project created and the necessary assets are uploaded to this project.
In general you should seperate the resource management from your Movie creation scripts, so that you won't create a project with assets everytime you change a Movie.
Movie Setup
def adjust_params(movie, (width, height)):
    vp = movie.params.vparams
    vp.width = width
    vp.height = height
    vp.videorc = proto.VideoParams.VRC_RATEFACTOR
    vp.videoqp = 22
    vp.videodelayrequirement = proto.VideoParams.DELAY_SMALL
    vp.videocpueffort = 20
    vp.videoframerate.num = 25

def build_movie():
    movie = proto.Movie()
    adjust_params(movie, (960, 544))

    scene = movie.scenes.add()
    scene.numframes = 75

    add_base_track(scene.tracks)
    add_face_mapping_track(scene.tracks)
    add_light_effect_track(scene.tracks)
    add_shadow_effect_track(scene.tracks)

    return movie
function build_movie() {
    var movie = new sdl.Movie({
      params: {
        vparams: {
            width: 960,
            height: 544,
            videoframerate: {
                num: 25
            }
        }
      }
    });

    var scene = new sdl.Scene({
        numframes: 75
    });

    movie.scenes.push(scene);
    add_base_track(scene.tracks);
    add_face_mapping_track(scene.tracks);
    add_light_effect_track(scene.tracks);
    add_shadow_effect_track(scene.tracks);

    return movie;
}
{
    "scenes": [
        {
            "numframes": 75,
            "tracks": [ ... ]
        }
    ],
    "params": {
        "vparams": {
            "width": 960,
            "height": 544,
            "videodelayrequirement": "DELAY_SMALL",
            "videorc": "VRC_RATEFACTOR",
            "videoframerate": {
                "num": 25
            },
            "videocpueffort": 20,
            "videoqp": 22
        }
    },
    "name": "uvmap"
}
FXProto.Movie buildMovie() {
    return FXProto.Movie.newBuilder()
        .setParams(FXProto.StreamParams.newBuilder()
            .setVparams(FXProto.VideoParams.newBuilder()
                .setWidth(960)
                .setHeight(544)
                .setVideoframerate(FXProto.Fractional.newBuilder()
                    .setNum(25))))
        .addScenes(FXProto.Scene.newBuilder()
                .addTracks(newBaseTrack())
                .addTracks(newFaceTrack())
                .addTracks(newLightEffectTrack())
                .addTracks(newShaddowEffectTrack()))
        .build();
}
For the Movie initialization we setup a simple Movie object with minimal default parameters and one Scene. The function is called build_movie(). The only thing we need to set directly on the Scene is numframes. We then add the 4 VisualTracks, discussed in more detail below.
Base Video
def add_base_track(tracks):
    t = tracks.add()
    content = t.content
    content.type = proto.ImageProvider.video
    content.source.path = "userdata/uvbase.zip"
{
    "content": {
        "type": "video",
        "source": {
            "path": "userdata/uvbase.zip"
        }
    }
}
FXProto.VisualTrack.Builder newBaseTrack() {
    return FXProto.VisualTrack.newBuilder()
        .setContent(FXProto.ImageProvider.newBuilder()
            .setType(FXProto.ImageProvider.Type.video)
            .setSource(FXProto.FileLocation.newBuilder()
                .setPath("userdata/uvbase.zip")));
}
function add_base_track(tracks) {
    tracks.push(new sdl.VisualTrack({
      content: {
          type: "video",
          source: {
            path: "userdata/uvbase.zip"
          }
      }
    }));
}
The base video is inserted into the scene in the first VisualTrack using an ImageProvider of the video type. This is pretty straight forward. We add a VisualTrack to the Scene's tracks, set the type of its content to video and point the source to our base video file.
User Image
def add_face_mapping_track(tracks):
t = tracks.add()
content = t.content
content.type = proto.ImageProvider.http
content.source.path = "http://$variable"
content.source.variable.type = proto.StringVariable.map
content.source.variable.key = "userface"
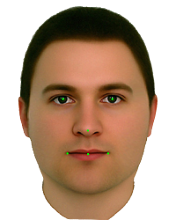
content.source.variable.defaultvalue = "iv.impossiblesoftware.com/iv/apps/media/data/Demos/7119dc30-f1a9-4f4f-9033-121602dd4736/userdata/euro-normgesicht-male-breit.jpg"
add_face_morph_transformation(t.transformations)
add_face_uvmap_transformation(t.transformations)
add_face_mask_transformation(t.transformations)
{
    "content": {
        "type": "http",
        "source": {
            "type": "var",
            "path": "http://$variable",
            "variable": {
                "type": "map",
                "defaultvalue": "iv.impossiblesoftware.com/iv/apps/media/data/Demos/7119dc30-f1a9-4f4f-9033-121602dd4736/userdata/euro-normgesicht-male-breit.jpg",
                "key": "userface"
            }
        }
    },

    "transformations": [ ... ]
}
FXProto.VisualTrack.Builder newFaceTrack() {
    return FXProto.VisualTrack.newBuilder()
        .setContent(FXProto.ImageProvider.newBuilder()
            .setType(FXProto.ImageProvider.Type.http)
            .setSource(FXProto.FileLocation.newBuilder()
                .setPath("http://$variable")
                .setVariable(FXProto.StringVariable.newBuilder()
                    .setType(FXProto.StringVariable.Type.map)
                    .setKey("userface"))))
        .addAllTransformations(Arrays.asList(
            newMorphTransformation(),
            newUVMapTransformation(),
            newMaskTransformation()));
}
function add_face_mapping_track(tracks) {
    var track = new sdl.VisualTrack({
      content: {
        type: "http",
        source: {
          path: "http://$variable",
          variable: {
            type: "map",
            key: "userface",
            defaultvalue: "http://farm1.static.flickr.com/60/191463580_94b6b4a14c.jpg"
          }
        }
      }
    });

    tracks.push(track);

    add_face_morph_transformation(track.transformations);
    add_face_uvmap_transformation(track.transformations);
    add_face_mask_transformation(track.transformations);
}
The user image layer is the meat of this Dynamic Movie where the facemapping happens.
As for the base layer we add a VisualTrack, but with content of type http. The source of this ImageProvider makes use of a Variable with key "userface", so that a different user image can be fetched for every video rendered. We also add three Transformations, for Morphing, UV Mapping and Masking the image.
The user image will be fetched over HTTP from a source we provide. This could be a frontend webserver, where the user uploaded the image as part of the configuration process to determine the dynamic content for the video. Or the user images could be taken from Facebook, Instagram or some other social network site (e.g. via OAuth).
It is important to know in what size and more importantly aspect ratio the user images will be provided from the HTTP source. If the aspect ratio does not match the one, that is expected in further Transformation steps the image could be stretched and distorted and the result will not look good. If we can't garantuee a certain aspect ratio from whatever service we get the user image from, we can use a scalingaspect/scalingcrop Transformation on the user image before further processing.
For this tutorial we assume a garantueed aspect ratio of 4:5.
Face Morphing
def point(x,y):
    p = proto.Point()
    p.x=x
    p.y=y
    return p

def setup_constant_points_trackdata(trackdata, points):
    trackdata.type = proto.TrackData.variable
    trackdata.points.type = proto.PointsVariable.constant
    trackdata.points.value.points.extend(points)


def setup_dynamic_points_trackdata(trackdata, key, defaultpoints):
    trackdata.type = proto.TrackData.variable
    trackdata.points.type = proto.PointsVariable.map
    trackdata.points.key = key
    trackdata.points.defaultvalue.points.extend(defaultpoints)


def add_face_morph_transformation(transformations):
    trans = transformations.add()
    trans.type = proto.Transformation.morph
    trans.numpoints = 6

    destinationpoints = [
        point(0.3575,  0.45),
        point(0.6375,  0.45),
        point(0.49875, 0.593),
        point(0.38125, 0.697),
        point(0.61375, 0.697),
        point(0.5,     0.7),
    ]

    setup_constant_points_trackdata(trans.morphdestinationpoints, destinationpoints)
    setup_dynamic_points_trackdata(trans.morphsourcepoints, "morphpoints", destinationpoints)
{
    "numpoints": 6,
    "type": "morph",
    "morphdestinationpoints": {
        "points": {
            "type": "constant",
            "value": {
                "points": [
                    {"x": 0.3575,  "y": 0.45},
                    {"x": 0.6375,  "y": 0.45},
                    {"x": 0.49875, "y": 0.593},
                    {"x": 0.38125, "y": 0.697},
                    {"x": 0.61375, "y": 0.697},
                    {"x": 0.5,     "y": 0.7}
                ]
            }
        },
        "type": "variable"
    },
    "morphsourcepoints": {
        "points": {
            "type": "map",
            "defaultvalue": {
                "points": [
                    {"x": 0.3575,   "y": 0.45},
                    {"x": 0.6375,   "y": 0.45},
                    {"x": 0.49875,  "y": 0.593},
                    {"x": 0.38125,  "y": 0.697},
                    {"x": 0.61375,  "y": 0.697},
                    {"x": 0.5,      "y": 0.7}
                ]
            },
            "key": "morphpoints"
        },
        "type": "variable"
    }
}
function add_face_morph_transformation(txforms) {
  var destinationpoints = [
    {x: 0.3575,  y: 0.45},
    {x: 0.6375,  y: 0.45},
    {x: 0.49875,  y: 0.593},
    {x: 0.38125,  y: 0.697},
    {x: 0.61375,  y: 0.697},
    {x: 0.5,  y: 0.7}
  ];

  var morph = new sdl.Transformation({
    type: "morph",
    numpoints: 6,
    morphsourcepoints: {
      type: "variable",
      points: {
        type: "map",
        key: "morphpoints",
        defaultvalue: {
          points: destinationpoints
        }
      }
    },
    morphdestinationpoints: {
      type: "variable",
      points: {
        type: "constant",
        value: {
          points: destinationpoints
        }
      }
    }
  })

  txforms.push(morph);
}
static final FXProto.PointsVector.Builder destinationpoints =
    FXProto.PointsVector.newBuilder()
        .addAllPoints( Arrays.asList(
            FXProto.Point.newBuilder().setX(0.3575).setY(0.45).build(),
            FXProto.Point.newBuilder().setX(0.6375).setY(0.45).build(),
            FXProto.Point.newBuilder().setX(0.49875).setY(0.593).build(),
            FXProto.Point.newBuilder().setX(0.38125).setY(0.697).build(),
            FXProto.Point.newBuilder().setX(0.61375).setY(0.697).build(),
            FXProto.Point.newBuilder().setX(0.5).setY(0.7).build()));

FXProto.Transformation newMorphTransformation() {
    return FXProto.Transformation.newBuilder()
        .setType(FXProto.Transformation.Type.morph)
        .setNumpoints(6)
        .setMorphdestinationpoints(FXProto.TrackData.newBuilder()
                .setType(FXProto.TrackData.Type.variable)
                .setPoints(FXProto.PointsVariable.newBuilder()
                    .setType(FXProto.PointsVariable.Type.constant)
                    .setValue(destinationpoints)))
        .setMorphsourcepoints(FXProto.TrackData.newBuilder()
                .setType(FXProto.TrackData.Type.variable)
                .setPoints(FXProto.PointsVariable.newBuilder()
                    .setType(FXProto.PointsVariable.Type.map)
                    .setKey("morphpoints")
                    .setDefaultvalue(destinationpoints)))
        .build();
}
The UV maps will be based on one canonical face. This could be for example an average face of your target demographic. We then need to morph the input user image so that the main features like eyes, nose and mouth overlap the canonical face. If we fail to do that, eye and mouth movement contained in the UV maps will not move the eyes and the mouth of our user image and our results will look less good.
We will use the morph Transformation for this, which uses the Moving Least Squares algorithm to morph an image according to a set of source and destination points.
The source and destination points are expected to be normalized between 0.0 and 1.0 to make them independent of actual input image size. Destination points are constant, as they are the position of the important features (eyes, nose, mouth) in our canonical image. Source points will be provided by a Variable (here using the key "morphpoints").
TrackData of type variable use a PointsVariable. PointsVariables expect input data as list of coordiates, seperated by comma, semicolon or space in the form x1,y1,x2,y2,x3,y3,....
A valid set of morph coordinates for the canonical face would look like this: 0.3575,0.45,0.6375,0.45,0.49875,0.593,0.38125,0.697,0.61375,0.697,0.5,0.7
UV Mapping
def add_face_uvmap_transformation(transformations):
    trans = transformations.add()
    trans.type = proto.Transformation.texturemapping32f
    trans.image.type = proto.ImageProvider.video
    trans.image.source.path = "userdata/faceuvmap.uvmap"
{
    "type": "texturemapping32f",
    "image": {
        "type": "video",
        "source": {
            "path": "userdata/faceuvmap.uvmap"
        }
    }
}
function add_face_uvmap_transformation(txforms) {
  txforms.push(new sdl.Transformation({
    type: "texturemapping32f",
    image: {
      type: "video",
      source: {
        path: "userdata/faceuvmap.uvmap"
      }
    }
  }));
}
FXProto.Transformation newUVMapTransformation() {
    return FXProto.Transformation.newBuilder()
            .setType(FXProto.Transformation.Type.texturemapping32f)
            .setImage(FXProto.ImageProvider.newBuilder()
                    .setType(FXProto.ImageProvider.Type.video)
                    .setSource(FXProto.FileLocation.newBuilder()
                            .setPath("userdata/faceuvmap.uvmap")))
            .build();
}
In this example the UV maps are used for positioning of the face in the frame and also contain changes of facial expression. The setup of the texturemapping32f Transformation is straight forward. The type of the ImageProvider image is set as video, with its source pointing to our UV map sequence: faceuvmap.uvmap.
UV maps are expected to be 32bit floating point TIFF-images, with pixel values in their read and green channel between 0.0 and 1.0.
To facilitate the handling of sequences of UV maps, the video ImageProvider can recognise zip files with a custom filename extension ('.uvmap') as sequence of images. The filename indicates to treat the contained images as UV Maps. The images in the zip file will be treated as frames in lexicographical order of the filename. Alternatively the UV maps can be uploaded as separate image assets and used with the imagesequence32f ImageProvider, but this approach is not recommended as management and replacement of the files will get more complicated.
It is absolutely essential that the UV Maps are exported without a color model. With a color model the positioning data encoded in the color channels the UV map will be wrong.
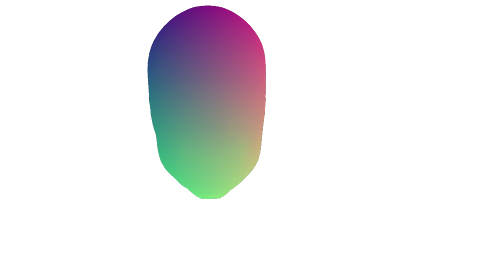
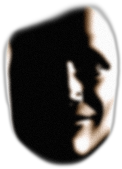
An UV map frame (converted to 8bit). In the UV map you can see the face outline and a red gradient in X-direction, a green gradient in Y-direction.
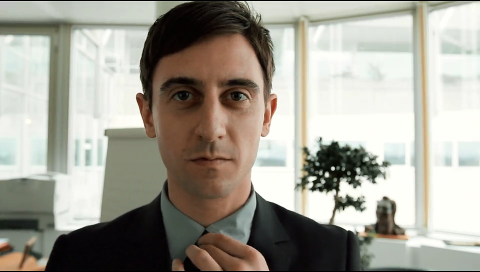
The face after UV mapping.
Masking
def add_face_mask_transformation(transformations):
    trans = transformations.add()
    trans.type = proto.Transformation.mask

    trans.image.type = proto.ImageProvider.video
    trans.image.source.path = "userdata/facemask.zip"
{
    "type": "mask",
    "image": {
        "type": "video",
        "source": {
            "path": "userdata/facemask.zip"
        }
    }
}
function add_face_mask_transformation(txforms) {
  txforms.push(new sdl.Transformation({
    type: "mask",
    image: {
      type: "video",
      source: {
        path: "userdata/facemask.zip"
      }
    }
  }));
}
FXProto.Transformation newMaskTransformation() {
    return FXProto.Transformation.newBuilder()
            .setType(FXProto.Transformation.Type.mask)
            .setImage(FXProto.ImageProvider.newBuilder()
                    .setType(FXProto.ImageProvider.Type.video)
                    .setSource(FXProto.FileLocation.newBuilder()
                            .setPath("userdata/facemask.zip")))
            .build();
}
Because the user image in general does not contain any transparent pixels and the UV mapping will not introduce additional alpha information, we have to mask out the face after the UV mapping is applied.
The mask Transformation is simple. We just set image to an appropriate ImageProvider, in this case of type video.
We use a mask with black and white frames so it is not necessary to change the default maskchannel of 0. To use the alpha channel of the mask frames instead, maskchannel would have to be changed to 4.
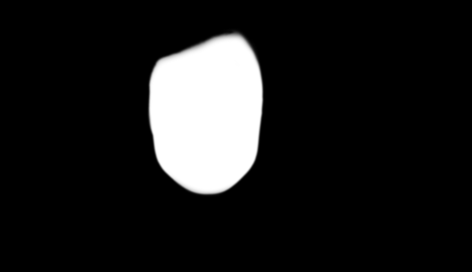
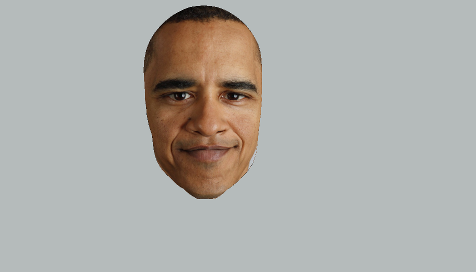
A mask for the face
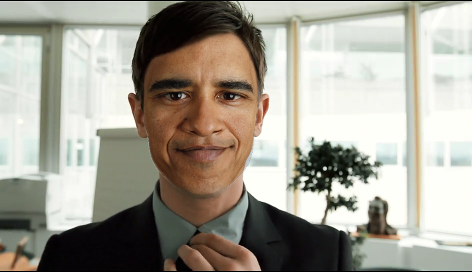
The face masked out after UV mapping
Extra Effects
def add_light_effect_track(tracks):
    t = tracks.add()
    content = t.content
    content.type = proto.ImageProvider.video
    content.source.path = "userdata/faceeffect01.zip"
    t.opacity = 0.05


def add_shadow_effect_track(tracks):
    t = tracks.add()
    content = t.content
    content.type = proto.ImageProvider.video
    content.source.path = "userdata/faceeffect02.zip"
    t.opacity = 0.2
    t.blendmode = proto.multiply
[
    {
        "content": {
            "type": "video",
            "source": {
                "path": "userdata/faceeffect01.zip"
            }
        },
        "opacity": 0.05
    },
    {
        "content": {
            "type": "video",
            "source": {
                "path": "userdata/faceeffect02.zip"
            }
        },
        "blendmode": "multiply",
        "opacity": 0.2
    }
]
function add_light_effect_track(tracks) {
    tracks.push(new sdl.VisualTrack({
        content: {
          type: "video",
          source: {
            path: "userdata/faceeffect01.zip"
          }
        },
        opacity: 0.05
    }));
}

function add_shadow_effect_track(tracks) {
    tracks.push(new sdl.VisualTrack({
        content: {
          type: "video",
          source: {
            path: "userdata/faceeffect02.zip"
          }
        },
        opacity: 0.20,
        blendmode: "multiply"
    }));
}
FXProto.VisualTrack.Builder newLightEffectTrack() {
    return FXProto.VisualTrack.newBuilder()
            .setOpacity(0.05)
            .setContent(FXProto.ImageProvider.newBuilder()
                .setType(FXProto.ImageProvider.Type.video)
                .setSource(FXProto.FileLocation.newBuilder()
                    .setPath("userdata/faceeffect01.zip")));
}

FXProto.VisualTrack.Builder newShaddowEffectTrack() {
    return FXProto.VisualTrack.newBuilder()
            .setOpacity(0.2)
            .setBlendmode(FXProto.BlendMode.multiply)
            .setContent(FXProto.ImageProvider.newBuilder()
                    .setType(FXProto.ImageProvider.Type.video)
                    .setSource(FXProto.FileLocation.newBuilder()
                            .setPath("userdata/faceeffect01.zip")));
}
The effects layer are added on top of the transformed user image to provide lighting and shadow information on the face area to make the look more natural.
The setup is similar to the base layer, VisualTracks with video ImageProvider, with the only differences in the opacity and the blendmode.
Light effect map
Shadow effect map